Netaji Subhas University of Technology (NSUT), Delhi
Department of Geoinformatics
Web Technology Laboratory Manual
Table of Contents
- Experiment 1: Introduction to HTML, CSS, JavaScript, and XML
- Experiment 2: Demonstration of Tags and Hyperlinks (Page-to-Page & Within Page)
- Experiment 3: Class Timetable Using Table Tags
- Experiment 4: Demonstration of Lists (Unordered, Ordered, Definition, Nested)
- Experiment 5: Static Student Registration Form
- Experiment 6: Static Student Login Page
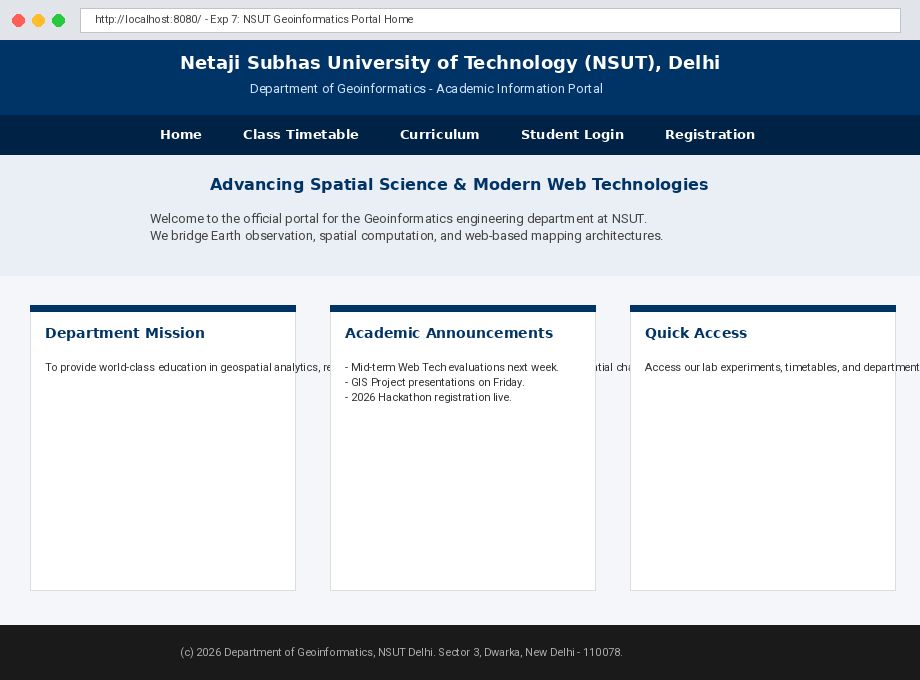
- Experiment 7: Static Department Home Page
- Experiment 8: Demonstration of Cascading Style Sheets (Embedded, External, Inline)
EXPERIMENT 1
Aim
Introduction to HTML, CSS, JavaScript, and XML.
Theory
The modern World Wide Web operates via the cooperative integration of four primary technologies:
1. HTML (HyperText Markup Language): Structures content into semantic elements such as headings, divisions, tables, and buttons.
2. CSS (Cascading Style Sheets): Controls visual presentation, typography, component spacing, responsive flexbox layouts, and color palettes.
3. JavaScript: A client-side scripting language that provides dynamic interactivity, handles user click events, and manipulates the Document Object Model (DOM) in real-time.
4. XML (eXtensible Markup Language): A hardware- and software-neutral markup standard used to store, describe, and serialize hierarchical structured datasets (such as geospatial entities and academic records).
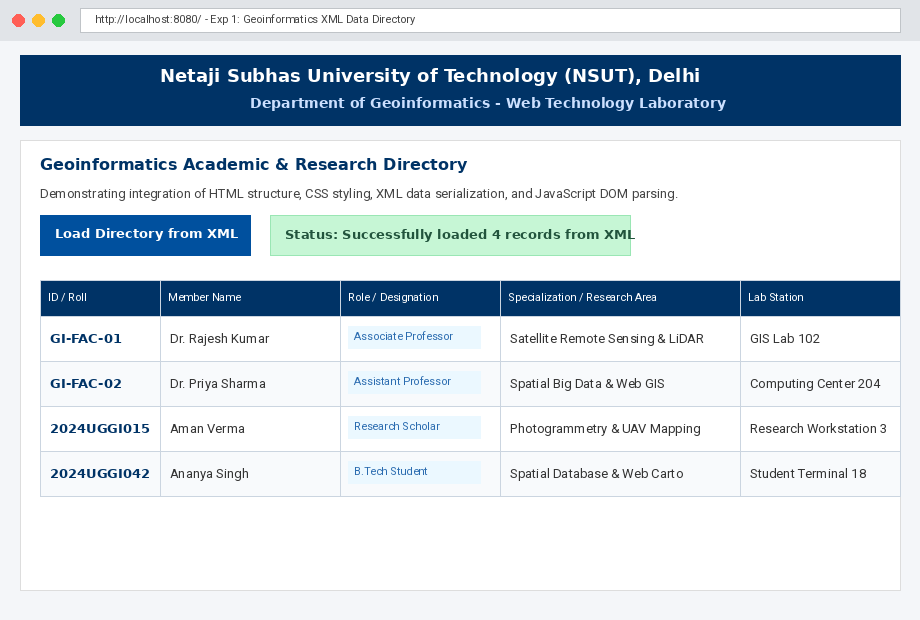
In modern web development, these technologies combine cohesively: XML transports raw structured data, JavaScript parses the data using the DOMParser API, HTML provides the dynamic container elements, and CSS styles the output into clean, user-friendly interfaces.
Source Code (exp1/index.html)
<!DOCTYPE html>
<html lang="en">
<head>
<meta charset="UTF-8">
<title>Exp 1 - Geoinformatics Portal | XML, JS, CSS & HTML Integration</title>
<!-- CSS: Layout, styling, badge colors, table borders, and interactive transitions -->
<style>
body {
font-family: Arial, sans-serif;
background-color: #f4f7fa;
margin: 0;
padding: 25px;
color: #333;
}
.header {
background-color: #003366;
color: #ffffff;
padding: 20px;
text-align: center;
border-radius: 6px;
}
.header h1 {
margin: 0 0 5px 0;
font-size: 22px;
}
.header p {
margin: 0;
font-size: 14px;
color: #cce0ff;
}
.container {
max-width: 900px;
margin: 20px auto;
background: #ffffff;
padding: 25px;
border-radius: 6px;
box-shadow: 0 2px 6px rgba(0,0,0,0.08);
}
.controls {
display: flex;
align-items: center;
gap: 15px;
margin-bottom: 20px;
}
button {
background-color: #00509e;
color: white;
border: none;
padding: 10px 20px;
border-radius: 4px;
font-size: 14px;
font-weight: bold;
cursor: pointer;
transition: background 0.2s;
}
button:hover {
background-color: #003366;
}
.status-badge {
font-size: 13px;
font-weight: bold;
padding: 6px 12px;
border-radius: 4px;
background-color: #e2e8f0;
color: #4a5568;
}
table {
width: 100%;
border-collapse: collapse;
margin-top: 15px;
}
th, td {
border: 1px solid #cbd5e0;
padding: 12px;
text-align: left;
font-size: 14px;
}
th {
background-color: #003366;
color: #ffffff;
}
tr:nth-child(even) {
background-color: #f8fafc;
}
tr:hover {
background-color: #edf2f7;
}
.tag {
display: inline-block;
background-color: #ebf8ff;
color: #2b6cb0;
padding: 2px 8px;
border-radius: 3px;
font-size: 12px;
font-weight: bold;
}
</style>
</head>
<body>
<!-- HTML: Semantic structure and containers -->
<div class="header">
<h1>Netaji Subhas University of Technology (NSUT), Delhi</h1>
<p>Department of Geoinformatics • Web Technology Laboratory</p>
</div>
<div class="container">
<h2>Geoinformatics Academic & Research Directory</h2>
<p>Demonstrating integration of <strong>HTML</strong> structure, <strong>CSS</strong> styling, <strong>XML</strong> data serialization, and <strong>JavaScript</strong> client-side parsing.</p>
<div class="controls">
<button onclick="loadXmlDirectory()">Load Directory from XML</button>
<span id="load-status" class="status-badge">Status: Awaiting XML Load</span>
</div>
<!-- Target table populated dynamically via JavaScript DOM operations -->
<table id="directory-table" style="display: none;">
<thead>
<tr>
<th>ID / Roll</th>
<th>Member Name</th>
<th>Role / Designation</th>
<th>Specialization / Research Area</th>
<th>Lab Station</th>
</tr>
</thead>
<tbody id="directory-body">
</tbody>
</table>
</div>
<!-- JavaScript: DOM Parser to load and parse XML string, then generate table rows -->
<script>
// Sample XML Data storing Geoinformatics department records
var xmlDataString = `<?xml version="1.0" encoding="UTF-8"?>
<department name="Geoinformatics" university="NSUT Delhi">
<member id="GI-FAC-01">
<name>Dr. Rajesh Kumar</name>
<role>Associate Professor</role>
<specialization>Satellite Remote Sensing & LiDAR</specialization>
<station>GIS Lab 102</station>
</member>
<member id="GI-FAC-02">
<name>Dr. Priya Sharma</name>
<role>Assistant Professor</role>
<specialization>Spatial Big Data & Web GIS</specialization>
<station>Computing Center 204</station>
</member>
<member id="2024UGGI015">
<name>Aman Verma</name>
<role>Research Scholar</role>
<specialization>Photogrammetry & UAV Mapping</specialization>
<station>Research Workstation 3</station>
</member>
<member id="2024UGGI042">
<name>Ananya Singh</name>
<role>B.Tech Student</role>
<specialization>Spatial Database & Web Cartography</specialization>
<station>Student Lab Terminal 18</station>
</member>
</department>`;
function loadXmlDirectory() {
// 1. Use DOMParser to parse raw XML into an XMLDocument object
var parser = new DOMParser();
var xmlDoc = parser.parseFromString(xmlDataString, "text/xml");
// 2. Extract member nodes
var members = xmlDoc.getElementsByTagName("member");
var tbody = document.getElementById("directory-body");
tbody.innerHTML = ""; // Clear existing rows
// 3. Iterate over XML records and construct dynamic HTML table rows
for (var i = 0; i < members.length; i++) {
var member = members[i];
var id = member.getAttribute("id");
var name = member.getElementsByTagName("name")[0].textContent;
var role = member.getElementsByTagName("role")[0].textContent;
var spec = member.getElementsByTagName("specialization")[0].textContent;
var station = member.getElementsByTagName("station")[0].textContent;
var row = document.createElement("tr");
row.innerHTML = "<td><strong>" + id + "</strong></td>" +
"<td>" + name + "</td>" +
"<td><span class='tag'>" + role + "</span></td>" +
"<td>" + spec + "</td>" +
"<td>" + station + "</td>";
tbody.appendChild(row);
}
// 4. Reveal the table and update the status badge
document.getElementById("directory-table").style.display = "table";
var statusBadge = document.getElementById("load-status");
statusBadge.innerText = "Status: Successfully loaded " + members.length + " records from XML";
statusBadge.style.backgroundColor = "#c6f6d5";
statusBadge.style.color = "#22543d";
}
</script>
</body>
</html>
Output
EXPERIMENT 2
Aim
Write a HTML program for demonstrating different tags and hyperlinks:
- A. Navigation from one page to another
- B. Navigation within the page
Theory
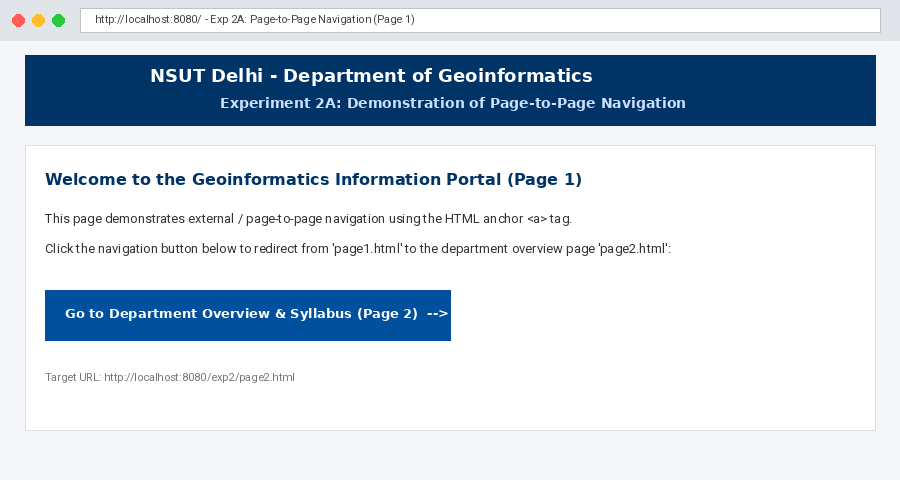
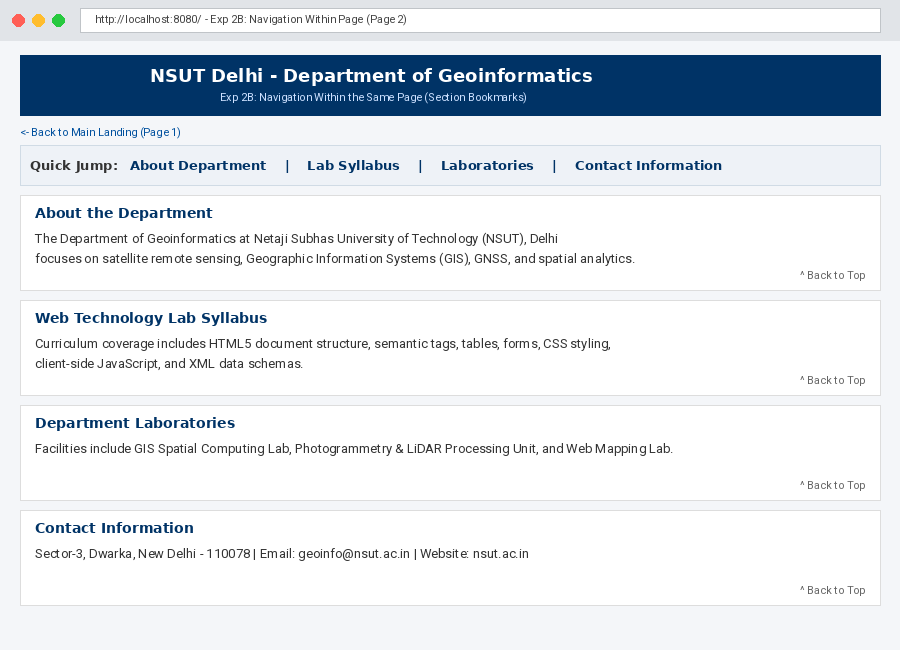
Hyperlinks are implemented via the anchor tag <a>. The destination is specified using the href (Hypertext Reference) attribute:
- Navigation from one page to another: Relative or absolute URLs are provided in the
hrefattribute (e.g.,<a href="page2.html">), triggering browser redirection to another document. - Navigation within the same page: Achieved by defining target fragment identifiers with an
idattribute on an element (e.g.,<section id="syllabus">) and linking to it using a hash mark prefix (e.g.,<a href="#syllabus">). This allows quick jumping across lengthy documents without page reloads.
Source Code
Part A: Navigation from One Page to Another (exp2/page1.html)
<!DOCTYPE html>
<html lang="en">
<head>
<meta charset="UTF-8">
<title>NSUT Geoinformatics - Page 1</title>
<style>
body { font-family: Arial, sans-serif; margin: 25px; line-height: 1.6; }
header { background: #003366; color: white; padding: 15px; border-radius: 4px; }
a.nav-btn {
display: inline-block;
background: #00509e;
color: white;
padding: 10px 18px;
text-decoration: none;
border-radius: 4px;
font-weight: bold;
margin-top: 15px;
}
a.nav-btn:hover { background: #003366; }
</style>
</head>
<body>
<header>
<h2>NSUT Delhi - Department of Geoinformatics</h2>
<p>Experiment 2A: Demonstration of Page-to-Page Navigation</p>
</header>
<main>
<h3>Welcome to the Geoinformatics Information Portal (Page 1)</h3>
<p>This page demonstrates external / page-to-page navigation using the HTML anchor <code><a href="..."></code> tag.</p>
<p>Click the link below to navigate to the detailed Departmental Overview & Course Syllabus page (Page 2):</p>
<!-- Navigation from one page to another -->
<a href="page2.html" class="nav-btn">Go to Department Overview & Syllabus (Page 2) →</a>
</main>
</body>
</html>
Output for Part A (Page 1 to Page 2 Navigation)
Part B: Navigation Within the Page (exp2/page2.html)
<!DOCTYPE html>
<html lang="en">
<head>
<meta charset="UTF-8">
<title>NSUT Geoinformatics - Page 2</title>
<style>
body { font-family: Arial, sans-serif; margin: 25px; line-height: 1.6; }
header { background: #003366; color: white; padding: 15px; border-radius: 4px; }
nav { background: #eef2f7; padding: 10px; margin: 15px 0; border-radius: 4px; }
nav a { margin-right: 20px; color: #003366; font-weight: bold; text-decoration: none; }
nav a:hover { text-decoration: underline; }
section {
background: #fafafa;
border: 1px solid #ddd;
padding: 20px;
margin: 20px 0;
border-radius: 4px;
min-height: 220px;
}
.top-link { display: inline-block; margin-top: 10px; font-size: 13px; color: #666; }
</style>
</head>
<body>
<header id="top">
<h2>NSUT Delhi - Department of Geoinformatics</h2>
<p>Experiment 2B: Navigation Within the Same Page (Section Bookmarks)</p>
</header>
<p><a href="page1.html">← Back to Main Landing (Page 1)</a></p>
<!-- Table of Contents Navigation Menu -->
<nav>
<strong>Quick Jump: </strong>
<a href="#about">About Department</a>
<a href="#syllabus">Lab Syllabus</a>
<a href="#labs">Laboratories</a>
<a href="#contact">Contact Information</a>
</nav>
<!-- Section 1 -->
<section id="about">
<h3>About the Department</h3>
<p>The Department of Geoinformatics at Netaji Subhas University of Technology (NSUT), Delhi focuses on satellite remote sensing, Geographic Information Systems (GIS), GNSS, photogrammetry, and spatial analytics.</p>
<a href="#top" class="top-link">↑ Back to Top</a>
</section>
<!-- Section 2 -->
<section id="syllabus">
<h3>Web Technology Lab Syllabus</h3>
<p>Curriculum coverage includes HTML5 document structure, semantic tags, tables, forms, CSS styling, client-side JavaScript, and XML data schemas.</p>
<a href="#top" class="top-link">↑ Back to Top</a>
</section>
<!-- Section 3 -->
<section id="labs">
<h3>Department Laboratories</h3>
<p>Facilities include GIS Spatial Computing Lab, Photogrammetry & LiDAR Processing Unit, and Web Mapping Applications Laboratory.</p>
<a href="#top" class="top-link">↑ Back to Top</a>
</section>
<!-- Section 4 -->
<section id="contact">
<h3>Contact Information</h3>
<p>Sector-3, Dwarka, New Delhi - 110078 | Email: geoinfo@nsut.ac.in | Website: nsut.ac.in</p>
<a href="#top" class="top-link">↑ Back to Top</a>
</section>
</body>
</html>
Output for Part B (Within-Page Bookmarks)
EXPERIMENT 3
Aim
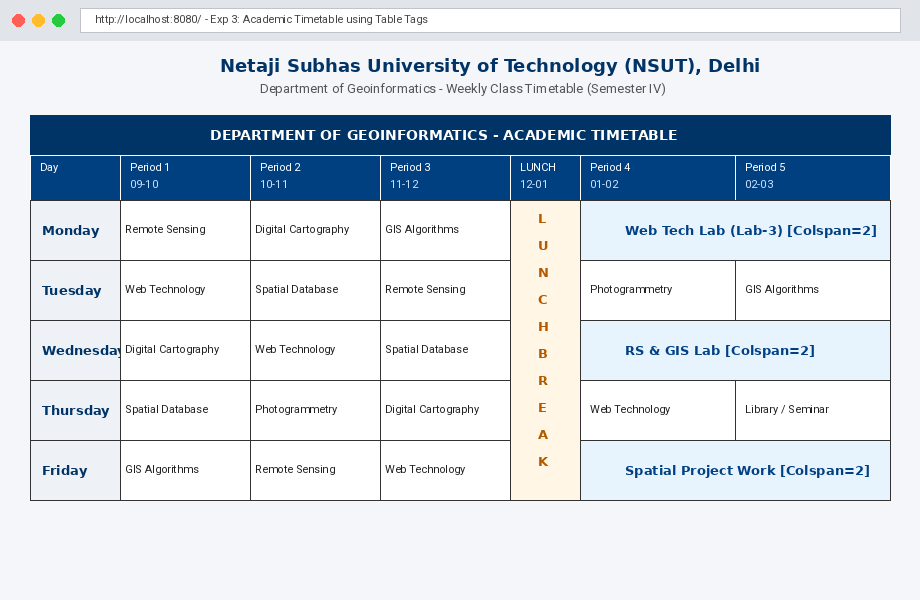
Write a HTML program for timetable using table tags.
Theory
HTML tables are declared using the <table> container element. Key constituent tags include:
- <tr>: Defines individual table rows.
- <th>: Defines header cells rendered in bold, centered typography.
- <td>: Defines standard data cells.
- colspan: Merges multiple adjacent columns horizontally into a single continuous cell.
- rowspan: Merges multiple vertical rows downwards, essential for spanning recurring periods such as lunch breaks and lab slots across consecutive weekdays.
Source Code (exp3/index.html)
<!DOCTYPE html>
<html lang="en">
<head>
    <meta charset="UTF-8">
    <title>Exp 3 - Class Timetable | NSUT Geoinformatics</title>
    <style>
        body {
            font-family: Arial, sans-serif;
            margin: 20px;
            background-color: #f9fbfd;
        }
        h2, h4 {
            text-align: center;
            color: #003366;
            margin: 5px 0;
        }
        table {
            width: 100%;
            border-collapse: collapse;
            margin-top: 20px;
            background-color: #ffffff;
            box-shadow: 0 2px 5px rgba(0,0,0,0.1);
        }
        th, td {
            border: 1px solid #333333;
            padding: 10px;
            text-align: center;
            font-size: 14px;
        }
        th {
            background-color: #003366;
            color: white;
        }
        .day-col {
            font-weight: bold;
            background-color: #eef2f7;
            width: 10%;
        }
        .lunch-break {
            background-color: #fffae6;
            font-weight: bold;
            color: #b35900;
            letter-spacing: 2px;
            width: 8%;
        }
        .lab-session {
            background-color: #e8f4fd;
            font-weight: bold;
            color: #004085;
        }
    </style>
</head>
<body>

    <h2>Netaji Subhas University of Technology (NSUT), Delhi</h2>
    <h4>Department of Geoinformatics - Weekly Class Timetable (Semester IV)</h4>

    <table>
        <!-- Table Header demonstrating Colspan -->
        <thead>
            <tr>
                <th colspan="7">DEPARTMENT OF GEOINFORMATICS - ACADEMIC TIMETABLE</th>
            </tr>
            <tr>
                <th>Day</th>
                <th>Period 1<br>(09:00 - 10:00)</th>
                <th>Period 2<br>(10:00 - 11:00)</th>
                <th>Period 3<br>(11:00 - 12:00)</th>
                <th>LUNCH<br>(12:00 - 01:00)</th>
                <th>Period 4<br>(01:00 - 02:00)</th>
                <th>Period 5<br>(02:00 - 03:00)</th>
            </tr>
        </thead>
        <tbody>
            <tr>
                <td class="day-col">Monday</td>
                <td>Remote Sensing</td>
                <td>Digital Cartography</td>
                <td>GIS Algorithms</td>
                <!-- Demonstrating Rowspan across 5 weekdays -->
                <td rowspan="5" class="lunch-break">L<br>U<br>N<br>C<br>H<br><br>B<br>R<br>E<br>A<br>K</td>
                <td colspan="2" class="lab-session">Web Technology Lab (Lab-3)</td>
            </tr>
            <tr>
                <td class="day-col">Tuesday</td>
                <td>Web Technology</td>
                <td>Spatial Database</td>
                <td>Remote Sensing</td>
                <td>Photogrammetry</td>
                <td>GIS Algorithms</td>
            </tr>
            <tr>
                <td class="day-col">Wednesday</td>
                <td>Digital Cartography</td>
                <td>Web Technology</td>
                <td>Spatial Database</td>
                <td colspan="2" class="lab-session">Remote Sensing & GIS Lab</td>
            </tr>
            <tr>
                <td class="day-col">Thursday</td>
                <td>Spatial Database</td>
                <td>Photogrammetry</td>
                <td>Digital Cartography</td>
                <td>Web Technology</td>
                <td>Library / Seminar</td>
            </tr>
            <tr>
                <td class="day-col">Friday</td>
                <td>GIS Algorithms</td>
                <td>Remote Sensing</td>
                <td>Web Technology</td>
                <td colspan="2" class="lab-session">Spatial Analysis Project Work</td>
            </tr>
        </tbody>
    </table>

</body>
</html>
Output
EXPERIMENT 4
Aim
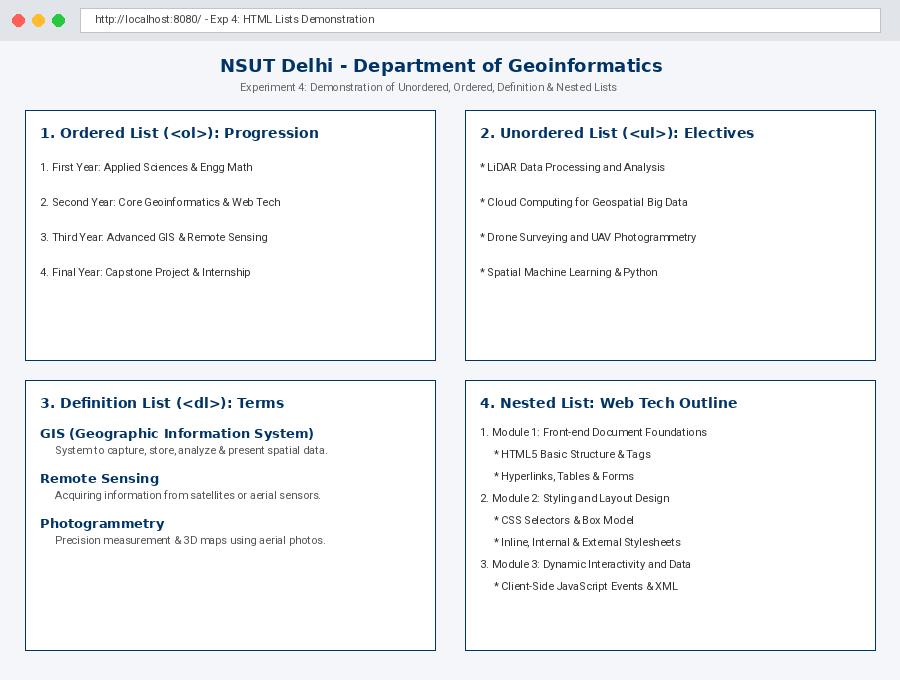
Write a HTML program for demonstration of lists:
- Unordered list
- Ordered list
- Definition list
- Nested list
Theory
HTML provides list elements to organize related items into readable hierarchies:
1. Ordered List (<ol>): Sequentially numbered items (<li>) indicating order or priority (numeric 1, 2, 3, roman numerals i, ii, or alphabetic a, b).
2. Unordered List (<ul>): Bulleted items (<li>) for collections where order does not imply rank (disc, circle, square).
3. Definition / Description List (<dl>): Contains paired glossary terms (<dt>) and descriptions (<dd>), ideal for dictionaries, FAQs, and technical specifications.
4. Nested List: Embedding one list container (<ul> or <ol>) inside an existing <li> to form multi-level hierarchical trees.
Source Code (exp4/index.html)
<!DOCTYPE html>
<html lang="en">
<head>
<meta charset="UTF-8">
<title>Exp 4 - HTML Lists Demonstration | NSUT Geoinformatics</title>
<style>
body {
font-family: Arial, sans-serif;
margin: 20px;
background-color: #f7f9fb;
line-height: 1.6;
}
h2 { color: #003366; text-align: center; }
.box {
background: #ffffff;
border-left: 4px solid #003366;
padding: 15px 25px;
margin-bottom: 20px;
border-radius: 4px;
box-shadow: 0 1px 3px rgba(0,0,0,0.1);
}
h3 { color: #004080; margin-top: 0; }
dt { font-weight: bold; color: #003366; margin-top: 8px; }
dd { margin-left: 20px; color: #444; }
</style>
</head>
<body>
<h2>NSUT Delhi - Department of Geoinformatics</h2>
<p style="text-align: center; color: #555;">Experiment 4: Demonstration of Unordered, Ordered, Definition, and Nested Lists</p>
<!-- 1. Ordered List -->
<div class="box">
<h3>1. Ordered List (<ol>): Academic Progression</h3>
<p>Demonstrating sequential numerical ordering:</p>
<ol type="1">
<li>First Year: Applied Sciences and Engineering Mathematics</li>
<li>Second Year: Core Geoinformatics & Web Technology Fundamentals</li>
<li>Third Year: Advanced GIS, Satellite Image Processing, and Spatial DB</li>
<li>Final Year: Major Capstone Project and Industrial Internship</li>
</ol>
</div>
<!-- 2. Unordered List -->
<div class="box">
<h3>2. Unordered List (<ul>): Department Elective Offerings</h3>
<p>Demonstrating bulleted lists for non-sequential items:</p>
<ul type="disc">
<li>LiDAR Data Processing and Analysis</li>
<li>Cloud Computing for Geospatial Big Data</li>
<li>Drone Surveying and UAV Photogrammetry</li>
<li>Spatial Machine Learning and Python Analytics</li>
</ul>
</div>
<!-- 3. Definition / Description List -->
<div class="box">
<h3>3. Definition List (<dl>): Geospatial Technical Terms</h3>
<p>Demonstrating paired term (<dt>) and description (<dd>) markup:</p>
<dl>
<dt>GIS (Geographic Information System)</dt>
<dd>A computer system designed to capture, store, manipulate, analyze, manage, and present all types of geographical data.</dd>
<dt>Remote Sensing</dt>
<dd>The science of obtaining information about objects or areas from a distance, typically from aircraft or satellites.</dd>
<dt>Photogrammetry</dt>
<dd>The technology of making precise measurements and 3D terrain maps using photographs.</dd>
</dl>
</div>
<!-- 4. Nested List -->
<div class="box">
<h3>4. Nested List: Web Technology Course Outline</h3>
<p>Demonstrating sub-lists hierarchically nested inside parent list elements:</p>
<ol>
<li>Module 1: Front-end Document Foundations
<ul>
<li>HTML5 Basic Structure and Syntax</li>
<li>Hyperlinks, Image Embeds, and Tables</li>
<li>HTML Forms and Interactive Input Controls</li>
</ul>
</li>
<li>Module 2: Styling and Layout Design
<ul>
<li>CSS Selectors and Box Model</li>
<li>Inline, Internal, and External Stylesheets</li>
</ul>
</li>
<li>Module 3: Dynamic Interactivity and Data
<ul>
<li>Client-Side JavaScript and DOM Events</li>
<li>XML Structure, Elements, and Attributes</li>
</ul>
</li>
</ol>
</div>
</body>
</html>
Output
EXPERIMENT 5
Aim
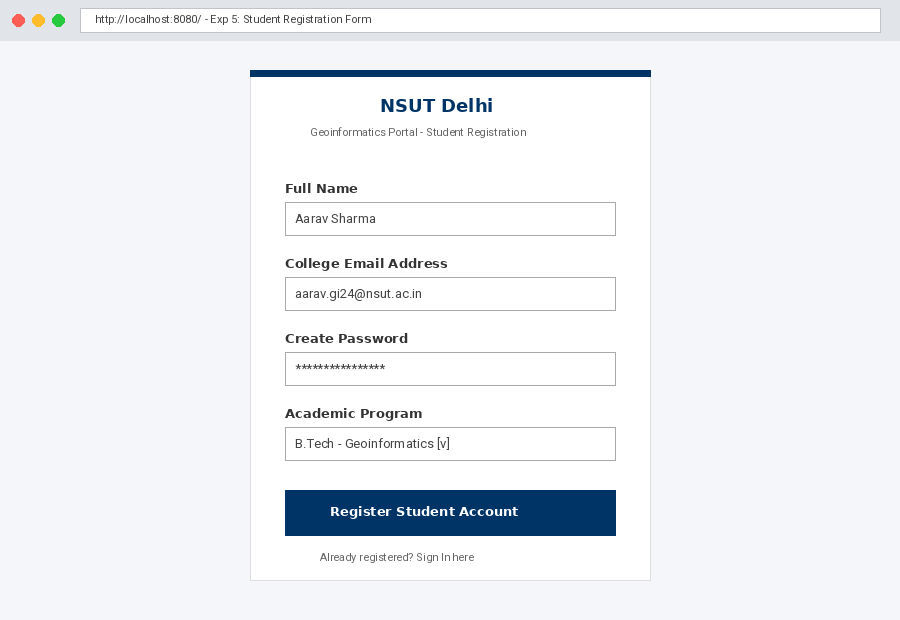
Write a HTML program to develop a static registration form.
Theory
HTML forms (<form>) serve as the primary mechanism for capturing user input and dispatching it to server-side endpoints. Forms utilize the action attribute for the submission URL and method (GET or POST) to designate transmission protocol.
Essential input controls include:
- <input type="text">: Captures single-line alphanumeric strings.
- <input type="email">: Validates syntactical format of email addresses.
- <input type="password">: Obscures typed characters for privacy.
- <select> & <option>: Generates a drop-down selection menu.
- <input type="submit">: Triggers form validation and dispatch.
Source Code (exp5/index.html)
<!DOCTYPE html>
<html lang="en">
<head>
    <meta charset="UTF-8">
    <title>Exp 5 - Student Registration | NSUT Geoinformatics</title>
    <style>
        body {
            font-family: Arial, sans-serif;
            background-color: #f0f2f5;
            margin: 0;
            padding: 20px;
            display: flex;
            justify-content: center;
        }
        .form-card {
            background-color: #ffffff;
            width: 400px;
            padding: 30px;
            border-radius: 8px;
            box-shadow: 0 4px 10px rgba(0,0,0,0.1);
            border-top: 5px solid #003366;
        }
        h2 {
            margin-top: 0;
            color: #003366;
            text-align: center;
        }
        p.subtitle {
            text-align: center;
            color: #666;
            margin-bottom: 25px;
            font-size: 14px;
        }
        .form-group {
            margin-bottom: 15px;
        }
        label {
            display: block;
            margin-bottom: 6px;
            font-weight: bold;
            font-size: 14px;
            color: #333;
        }
        input[type="text"],
        input[type="email"],
        input[type="password"],
        select {
            width: 100%;
            padding: 9px;
            box-sizing: border-box;
            border: 1px solid #ccc;
            border-radius: 4px;
            font-size: 14px;
        }
        input[type="submit"] {
            width: 100%;
            background-color: #003366;
            color: white;
            border: none;
            padding: 10px;
            border-radius: 4px;
            font-size: 15px;
            font-weight: bold;
            cursor: pointer;
            margin-top: 10px;
        }
        input[type="submit"]:hover {
            background-color: #004b99;
        }
        .footer-note {
            text-align: center;
            margin-top: 15px;
            font-size: 13px;
            color: #777;
        }
    </style>
</head>
<body>

    <div class="form-card">
        <h2>NSUT Delhi</h2>
        <p class="subtitle">Geoinformatics Portal - Student Registration</p>

        <form action="#" method="post">
            <!-- Full Name -->
            <div class="form-group">
                <label for="fullname">Full Name</label>
                <input type="text" id="fullname" name="fullname" placeholder="Enter student full name" required>
            </div>

            <!-- Email Address -->
            <div class="form-group">
                <label for="email">College Email Address</label>
                <input type="email" id="email" name="email" placeholder="student.gi@nsut.ac.in" required>
            </div>

            <!-- Password -->
            <div class="form-group">
                <label for="password">Create Password</label>
                <input type="password" id="password" name="password" placeholder="Choose a secure password" required>
            </div>

            <!-- Course Selection -->
            <div class="form-group">
                <label for="course">Academic Program</label>
                <select id="course" name="course" required>
                    <option value="">-- Select Course --</option>
                    <option value="btech_gi">B.Tech - Geoinformatics</option>
                    <option value="mtech_gis">M.Tech - Geospatial Technology</option>
                    <option value="phd">Ph.D - Remote Sensing & GIS</option>
                </select>
            </div>

            <!-- Submit Button -->
            <input type="submit" value="Register Student Account">
        </form>

        <p class="footer-note">Already registered? <a href="../exp6/index.html">Sign In here</a></p>
    </div>

</body>
</html>
Output
EXPERIMENT 6
Aim
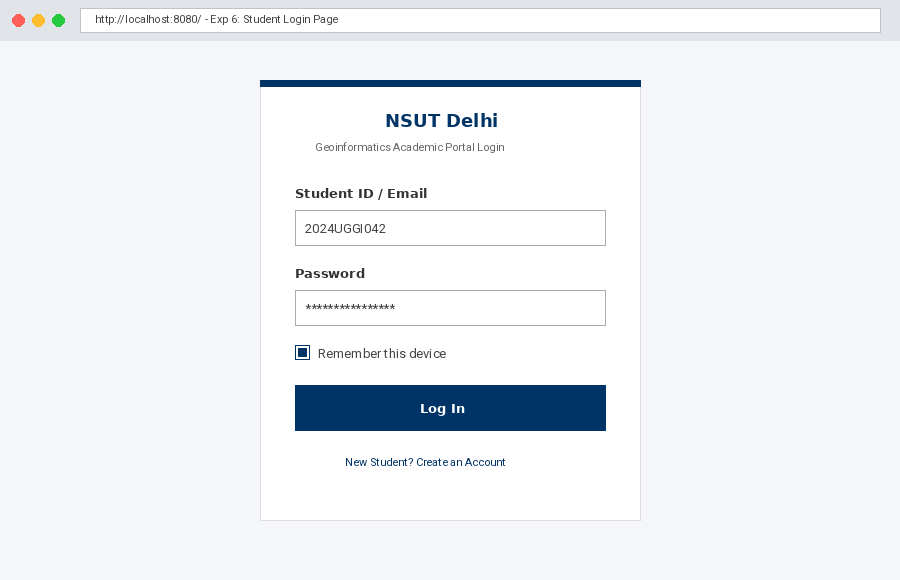
Write a HTML program to create a static login page.
Theory
A login page establishes authentication gates for secure web portals. It utilizes controlled form elements including identifier input (<input type="text"> or email), secure credential entry (<input type="password">), state toggles (<input type="checkbox"> for "Remember Me" session persistence), and submission controls. Static mockups structure the presentation and field validations prior to backend credential evaluation.
Source Code (exp6/index.html)
<!DOCTYPE html>
<html lang="en">
<head>
    <meta charset="UTF-8">
    <title>Exp 6 - Student Login | NSUT Geoinformatics</title>
    <style>
        body {
            font-family: Arial, sans-serif;
            background-color: #f0f2f5;
            margin: 0;
            padding: 40px 20px;
            display: flex;
            justify-content: center;
        }
        .login-card {
            background-color: #ffffff;
            width: 380px;
            padding: 30px;
            border-radius: 8px;
            box-shadow: 0 4px 10px rgba(0,0,0,0.1);
            border-top: 5px solid #003366;
        }
        h2 {
            margin-top: 0;
            color: #003366;
            text-align: center;
        }
        p.subtitle {
            text-align: center;
            color: #666;
            margin-bottom: 25px;
            font-size: 14px;
        }
        .form-group {
            margin-bottom: 16px;
        }
        label {
            display: block;
            margin-bottom: 6px;
            font-weight: bold;
            font-size: 14px;
            color: #333;
        }
        input[type="text"],
        input[type="password"] {
            width: 100%;
            padding: 9px;
            box-sizing: border-box;
            border: 1px solid #ccc;
            border-radius: 4px;
            font-size: 14px;
        }
        .remember-group {
            display: flex;
            align-items: center;
            margin-bottom: 18px;
            font-size: 13px;
            color: #444;
        }
        .remember-group input {
            margin-right: 8px;
        }
        input[type="submit"] {
            width: 100%;
            background-color: #003366;
            color: white;
            border: none;
            padding: 10px;
            border-radius: 4px;
            font-size: 15px;
            font-weight: bold;
            cursor: pointer;
        }
        input[type="submit"]:hover {
            background-color: #004b99;
        }
        .login-footer {
            text-align: center;
            margin-top: 18px;
            font-size: 13px;
            color: #777;
        }
        .login-footer a {
            color: #003366;
            text-decoration: none;
            font-weight: bold;
        }
        .login-footer a:hover {
            text-decoration: underline;
        }
    </style>
</head>
<body>

    <div class="login-card">
        <h2>NSUT Delhi</h2>
        <p class="subtitle">Geoinformatics Academic Portal Login</p>

        <form action="#" method="post">
            <!-- Student ID or Email -->
            <div class="form-group">
                <label for="username">Student ID / Email</label>
                <input type="text" id="username" name="username" placeholder="Enter Roll No or College Email" required>
            </div>

            <!-- Password -->
            <div class="form-group">
                <label for="password">Password</label>
                <input type="password" id="password" name="password" placeholder="Enter your password" required>
            </div>

            <!-- Remember Me Checkbox -->
            <div class="remember-group">
                <input type="checkbox" id="remember" name="remember">
                <label for="remember" style="font-weight: normal; margin-bottom: 0;">Remember this device</label>
            </div>

            <!-- Submit Button -->
            <input type="submit" value="Log In">
        </form>

        <div class="login-footer">
            <p>New Student? <a href="../exp5/index.html">Create an Account</a></p>
        </div>
    </div>

</body>
</html>
Output
EXPERIMENT 7
Aim
Write a HTML program to create a static home page.
Theory
A website homepage acts as the primary hub and central landing page for an organization or portal. Semantic HTML5 structural architecture is used:
- <header>: Carries university insignia, site title, and department branding.
- <nav>: Houses primary site navigation links unifying all pages.
- Main hero banner: Presents core institutional vision and introductory summaries.
- Flexbox grid container: Displays partitioned announcement cards and departmental highlights.
- <footer>: Contains copyright notices, postal address, and contact credentials.
Source Code (exp7/index.html)
<!DOCTYPE html>
<html lang="en">
<head>
<meta charset="UTF-8">
<title>NSUT Delhi - Department of Geoinformatics</title>
<style>
body {
font-family: Arial, sans-serif;
margin: 0;
padding: 0;
background-color: #f7f9fc;
color: #333;
}
/* Header */
header {
background-color: #003366;
color: white;
padding: 20px;
text-align: center;
}
header h1 { margin: 0; font-size: 24px; }
header p { margin: 5px 0 0; font-size: 14px; opacity: 0.9; }
/* Navigation Bar */
nav {
background-color: #002244;
display: flex;
justify-content: center;
}
nav a {
color: white;
padding: 12px 20px;
text-decoration: none;
font-size: 14px;
font-weight: bold;
}
nav a:hover {
background-color: #00509e;
}
/* Hero / Welcome Section */
.hero {
background-color: #e9eff5;
padding: 35px 20px;
text-align: center;
border-bottom: 2px solid #d0dbe5;
}
.hero h2 {
color: #003366;
margin-top: 0;
}
.hero p {
max-width: 750px;
margin: 10px auto;
line-height: 1.6;
}
/* Content Grid */
.container {
display: flex;
justify-content: space-around;
flex-wrap: wrap;
max-width: 1000px;
margin: 25px auto;
padding: 0 10px;
gap: 20px;
}
.card {
background: white;
flex: 1;
min-width: 280px;
padding: 20px;
border-radius: 6px;
box-shadow: 0 2px 5px rgba(0,0,0,0.08);
border-top: 4px solid #003366;
}
.card h3 {
color: #003366;
margin-top: 0;
}
/* Footer */
footer {
background-color: #1a1a1a;
color: #ccc;
text-align: center;
padding: 15px;
font-size: 13px;
margin-top: 30px;
}
</style>
</head>
<body>
<!-- University & Department Header -->
<header>
<h1>Netaji Subhas University of Technology (NSUT), Delhi</h1>
<p>Department of Geoinformatics - Academic Information Portal</p>
</header>
<!-- Navigation Menu -->
<nav>
<a href="../exp7/index.html">Home</a>
<a href="../exp3/index.html">Class Timetable</a>
<a href="../exp4/index.html">Curriculum</a>
<a href="../exp6/index.html">Student Login</a>
<a href="../exp5/index.html">Registration</a>
</nav>
<!-- Hero / Welcome Banner -->
<div class="hero">
<h2>Advancing Spatial Science & Modern Web Technologies</h2>
<p>
Welcome to the official portal for the Geoinformatics engineering department at NSUT.
We bridge Earth observation, spatial computation, and web-based mapping architectures.
</p>
</div>
<!-- Main Content Cards -->
<div class="container">
<div class="card">
<h3>Department Mission</h3>
<p>
To provide world-class education in geospatial analytics, remote sensing,
and web GIS, preparing students to solve pressing urban and environmental challenges.
</p>
</div>
<div class="card">
<h3>Academic Announcements</h3>
<ul>
<li>Mid-term Web Technology Lab evaluations scheduled for next week.</li>
<li>GIS Project presentations commence on Friday.</li>
<li>Registration for the 2026 Geoinformatics Hackathon is now live.</li>
</ul>
</div>
<div class="card">
<h3>Quick Access</h3>
<p>Access our lab experiments, timetables, and department directories directly through the upper menu bar.</p>
</div>
</div>
<!-- Footer -->
<footer>
<p>© 2026 Department of Geoinformatics, NSUT Delhi. Sector 3, Dwarka, New Delhi - 110078.</p>
</footer>
</body>
</html>
Output
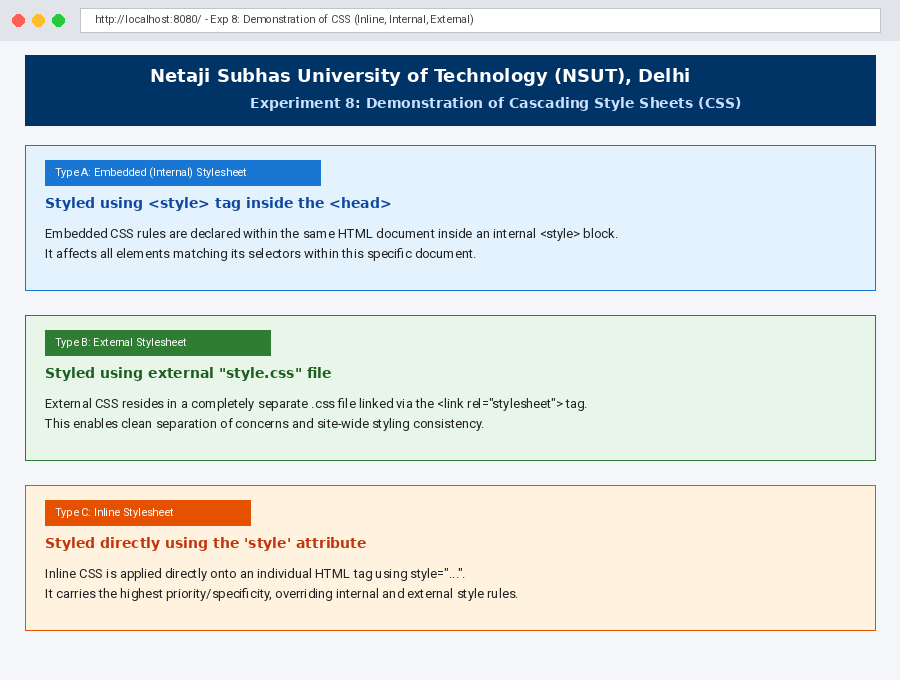
EXPERIMENT 8
Aim
Write a HTML program for demonstration of cascading style sheets:
- A. Embedded style sheets
- B. External style sheets
- C. Inline style sheets
Theory
CSS defines how HTML elements are presented. Styles can be attached through three primary approaches:
1. Embedded / Internal Stylesheet: Declared within the <head> section inside a <style> container tag. Applicable across all matched selectors in that specific document.
2. External Stylesheet: Stored in a standalone .css file linked via <link rel="stylesheet" href="...">. Provides global design consistency, code reusability, and clean separation of concerns across multiple HTML files.
3. Inline Stylesheet: Declared directly inside an opening HTML element tag via the style="..." attribute. It has the highest specificity, overriding conflicting rules from internal and external stylesheets.
Source Code
External CSS File (exp8/style.css)
/* External Stylesheet: style.css */
/* Demonstrating Experiment 8 Part B: External Stylesheet Rules */

.external-box {
    background-color: #e8f5e9;
    border: 2px solid #2e7d32;
    border-radius: 6px;
    padding: 16px;
    margin: 15px 0;
    box-shadow: 0 2px 4px rgba(0, 0, 0, 0.05);
}

.external-heading {
    color: #1b5e20;
    margin-top: 0;
}

.external-badge {
    background-color: #2e7d32;
    color: white;
    padding: 4px 10px;
    border-radius: 12px;
    font-size: 12px;
    font-weight: bold;
    display: inline-block;
    margin-bottom: 8px;
}
Main HTML File (exp8/index.html)
<!DOCTYPE html>
<html lang="en">
<head>
<meta charset="UTF-8">
<title>Exp 8 - Demonstration of Cascading Style Sheets | NSUT Geoinformatics</title>
<!-- Demonstration 8B: Linking to an External Style Sheet -->
<link rel="stylesheet" href="style.css">
<!-- Demonstration 8A: Embedded (Internal) Style Sheet -->
<style>
body {
font-family: Arial, sans-serif;
margin: 25px;
background-color: #f7f9fc;
line-height: 1.6;
}
.header {
text-align: center;
background-color: #003366;
color: white;
padding: 15px;
border-radius: 6px;
margin-bottom: 25px;
}
/* Internal / Embedded style classes */
.embedded-box {
background-color: #e3f2fd;
border: 2px solid #1976d2;
border-radius: 6px;
padding: 16px;
margin: 15px 0;
box-shadow: 0 2px 4px rgba(0, 0, 0, 0.05);
}
.embedded-heading {
color: #0d47a1;
margin-top: 0;
}
.embedded-badge {
background-color: #1976d2;
color: white;
padding: 4px 10px;
border-radius: 12px;
font-size: 12px;
font-weight: bold;
display: inline-block;
margin-bottom: 8px;
}
</style>
</head>
<body>
<div class="header">
<h2>Netaji Subhas University of Technology (NSUT), Delhi</h2>
<p>Department of Geoinformatics | Web Technology Lab</p>
<h3>Experiment 8: Demonstration of Cascading Style Sheets (CSS)</h3>
</div>
<!-- Demonstration 8A: Embedded Style Sheet -->
<div class="embedded-box">
<span class="embedded-badge">Type A: Embedded (Internal) Stylesheet</span>
<h3 class="embedded-heading">Styled using <style> tag inside the <head></h3>
<p>Embedded CSS rules are declared within the same HTML document inside an internal <code><style></code> block. It affects all elements matching its selectors within this specific document.</p>
</div>
<!-- Demonstration 8B: External Style Sheet -->
<div class="external-box">
<span class="external-badge">Type B: External Stylesheet</span>
<h3 class="external-heading">Styled using external "style.css" file</h3>
<p>External CSS resides in a completely separate <code>.css</code> file linked via the <code><link rel="stylesheet" href="style.css"></code> tag. This enables site-wide styling consistency across hundreds of pages.</p>
</div>
<!-- Demonstration 8C: Inline Style Sheet -->
<div style="background-color: #fff3e0; border: 2px solid #e65100; border-radius: 6px; padding: 16px; margin: 15px 0; box-shadow: 0 2px 4px rgba(0, 0, 0, 0.05);">
<span style="background-color: #e65100; color: white; padding: 4px 10px; border-radius: 12px; font-size: 12px; font-weight: bold; display: inline-block; margin-bottom: 8px;">Type C: Inline Stylesheet</span>
<h3 style="color: #bf360c; margin-top: 0;">Styled directly using the 'style' attribute</h3>
<p style="color: #3e2723; margin: 0;">Inline CSS is applied directly onto an individual HTML tag using the <code>style="..."</code> attribute. It holds the highest specificity among stylesheet types, overriding internal and external declarations for that element.</p>
</div>
</body>
</html>
Output